Ahoy! Old Techniques!

Ahoy, me hearties! I am finally sharing the process photos for these very nautical layouts. Both layouts include papers from the ‘Hey Sailor’ DCWV paper pad. The papers in this pad are all glossy and some have gold foil, the patterns/designs are mostly cream, navy and black. There is everything nautical included, ships, anchors, whales, etc., and I bought it thinking that it would be great for scrapping our many holiday trips to the Albany, Whale Station.

These layouts are the first I have made with the papers and they are nothing to do with a whaling station! The first layout is of my son-in-law who works at the Black Anchor Tattoo Studio, see the connection? Anchors! This paper had the perfect design, mood and feel for scrapping this photo of him, taken at work for marketing purposes. I selected five papers for this layout, a cut apart sheet, some black with gold anchors, a cream with navy anchors, a stripe which is lengths of rope and a framed design to use for the background.

The photo I had available was quite distant and I wanted to have a close up of his face included in the layout, so I cropped and enlarged the photo. This turned out a little grainy and not to the quality I wanted, so I used an old technique to enhance the photo, putting a layer of vellum over the photo. The vellum reduces the graininess of the image. I stitched it roughly together using my sewing machine, I wasn’t precious about it, wanting it rough and ready to work with the look I was going for.

Next, I stepped back in time with another old technique…sanding! The glossy surface didn’t appeal to me for my background and I grunged it up with a sandpaper pad. I got some lovely texture with the sanding, as I worked on my cutting board and all the cuts and nicks on the board were picked up in the sanding process.

Next, I built up layers mounting my photos on the patterned papers and using some of the cut apart embellishments. Then I added several wooden embellishments leaving some plain and inking others black. The last touch was adding some Tim Holtz chipboard quotes. 

I love how this one turned out, the papers and sanding really captured the mood I was going for. By the way, as a proud mother-in-law, I just want to say that the photographer did a great job taking Dane’s portrait but he did make him look quite stern and serious. Dane is the sweetest, nicest young man, and a very talented artist who works very hard, and is always ready with a smile and a joke. I’ve rarely seen him looking this stern.

2020-02-08 17.45.08-1

For the second nautical layout, I used an AB Studio paper for the background called ‘Rustical Journey‘, some scraps from an AB Studio paper called ‘Diary, sheet 7‘, and a few DCWV leftover scraps from the layout above. The chosen background paper worked beautifully with the photos of my daughter and son in law dressed up for a Halloween work event.

The first step was using some old nautical stamps to make some tag embellishments. The wooden stamps have been sitting unused for many years!

I used Ranger Archival Ink in Jet Black to stamp the images and then used some Tim Holtz Distress Oxide inks to add some colour. To add a little bling, I mounted one tag on gold foil cardstock.

Next, I worked on building up some texture on my background paper using stencils and distress inks. The green stencils are from Kaisercraft and the white from a Uniquely Creative kit. *Note: Did you know that Uniquely Creative are now producing their own papers/collections? Oh my, they are awesome, with the same quality as the AB Studio collections. The papers are thick cardstock and each collection has cut apart sheets for those of us who love to fussy cut. Great to see an Australian company doing so well, check them out on their website. I will be posting soon about using one of the latest kits, their third collection, the gorgeous ‘Urban Garden’ collection. Not affiliated with the company, just a subscriber and big fan of their products.

The last stencil I used was a beautiful lace image, I lightly inked the image by swiping the ink across the stencil to create a soft grey, rather than the harsh black of the inkpad. I also lightly stamped in the pirate and his treasure chest, making sure it was slightly washed out to give an old-worldly effect.

The tag edges were inked and some recycled (from a gift) twine added.

I used some gold enamel dots which have a look of what you might see on the sides of a treasure chest, the bolts, just to add some bling. These are from the local cheap shop, about $2AU. Then I popped on some quotes, inking the edges and added some gold glitter chipboard Thickers for the title.

Another successful nautical layout with mood and feel. How beautiful is my daughter, so lovely?

2020-02-08 13.11.08-1

I hope you are all getting some scrappy time, I’m off to scrap with my Uniquely Creative monthly subscription kit. Have a scrappy weekend 🙂

Flowers and AB Studio!

Good morning,

This weekend I am having fun playing with some AB Studio papers, I love all of their collections and recently purchased papers and sets from a few new ones. Two which I purchased are the ‘Breeze of the Forest’ and ‘Secret Wood’ set, both are very Winter snow and Christmas themed with beautiful illustrations of forest animals and snowy landscapes. Hmmm, those who know me may be asking why I would purchase these, given that I live where it never snows? Well, they are beautiful and many of the snowscapes have pine trees, which do surround our town. I hoped to be able to use them creatively for events and themes other than snowy weather and Christmas.

I also purchased some of the ‘Diary’ collection papers and the shabby  ‘Love Symphony’ papers, also beautiful papers with floral and heritage costume elements. So, a few weeks ago when I was up and about at 5am, I went around our garden taking photos of all the spring flowers blooming, these became my inspiration for creating with some of the AB Studio papers.

Layout #1,

I selected the ‘Memories’ paper from the Diary collection and the ‘First Rose’ cut apart element sheet. Plus, a few other bits and bobs from other companies to embellish the page, including some very old TLC chipboards buckles.

Then I decided to pull out an old Tim Holtz product, some grunge board, a giant @ symbol and used some oxide inks, water and colour sprays to add the right colour to match the background paper. I also added colour spray to the background, trying to not to form halo effects.

Then, it was simply a matter of adhering my photos, fussy cut roses and embellishments onto the dried background. Because my photos were of a climbing rose, I tried to make the rose embellishments climb around the photos. I also used some of the tags from the Diary collection cut apart sheet ‘Red is Bad’, some Kaisercraft paper roses (which I squashed to reduce the thickness) and some silver Thickers for the title.

The finished layout ended up over-embellished, taking up lots of space much like the rambling rose in our garden.

IMG_9953

Layout #2

For this layout, I selected another Diary collection paper for the background, ‘Your Own’, and the ‘4 Different Ways’ paper to fussy cut for embellishments, I only used one-quarter of the page. I had some old Kaisercraft door and quote diecuts and some more of those TLC buckles (which I didn’t end up using).

My photos of orchids had yellow and pink tones in the flowers and so I added some pink distress ink to the background, before adhering the photos into place.

Then, I adhered the fussy cut flowers and diecuts into place, with some of them I inked and distressed the edges first.  I love how this layout turned out, the subtle sepia brown flower diecuts enhance the photos.


IMG_9947

Layout #3

For this layout, I used the reverse of the ‘4 Different Ways’ paper (I purchased a few of this sheet)  which has a lovely black and white floral design and some stitching/costume elements. I also decided to use the leftover piece of the cut apart ‘First Rose’ sheet and fussy cut out the flowers for embellishments. There was also some leftover tags and quotes from the ‘Red is Bad’cut apart sheet.

This time my photos had a lot of green foliage in them and I decided to add green and pink to the background sheet. I lightly spritzed two shades of pink in the main area where my photos would be placed. I used a Kaisercraft stencil and after sampling different green inks went with Tim Holtz Oxide inks, they blend so beautifully and are thick and creamy. I wanted to create a halo of foliage around where my photos would sit and have the greenery travel across the page.

After mounting and adhering my photos into place, I added my fussy cut flowers, tucking the on and under the photos. When I ordered the AB Studio collections, etc., the lovely Bri from Anna’s Craftcupboard included a little freebie, 3 little silver glitter acrylic embellishments, so I added them to this layout. They are very cute and of good quality. Then I popped on some silver sparkle enamel dots and some little dots of Antique Silver Kindy Glitz. Here I am the anti glitter girl…adding sparkle!

2019-11-16 10.46.25-1

Layout #4

This time I used papers from the ‘Secret Wood’ and the ‘Breeze of the Forest’ Christmas/Snowy collections. Yep, snowy papers with rose hips, snow and winter foliage, with a few scraps from other companies, for a spring layout. The papers used are the bonus cut apart sheet, sheet #4, sheet #8 from the ‘Secret Wood’ and sheet #5 from the ‘Breeze of the Forest’.  I had six photos to include on this layout and decided to make a double page layout using a sketch map from a Scrapbook Generations travel ebook.

It was a pretty easy sketch to follow with good directions for selecting and cutting the papers. I grunged up the background by dragging some oxide ink across each page in a lovely soft yellow called Scattered Straw, before mounting and adhering my photos in place.

Then, I added some fussy cut flowers, some butterfly and quote die cuts, and some Nuvo Crystal Drops and rose gold Kindy Glitz. Plus, one of the TLC buckles with some organza ribbon. Overall, I am pretty happy with this layout, I doubt anyone would pick the papers as being Christmas themed.

2019-11-17 07.50.00-1

Please leave a comment below or share with other creatives, remember you need to open the post by clicking on the title to access the comment box if you are on the home page.

Happy scrapping everyone  🙂

Beauty! Mix it up!

Hello,

Today is a quick share using some old and newish papers. When I was tidying through my patterned paper collection I came across a FREEBY paper which I had stashed away years ago. It was from one of the now defunct scrapbook magazines, I’m not sure which magazine, as it was so long ago, but back in the day, a free paper cut apart sheet was often included in the monthly edition.

Anyhow, today was the day to use it! It is an A4 size sheet, one half is a lovely patterned piece of paper with lots of antique style text and images and the other half of the sheet has some lovely rectangular embellishment to cut out. There are gorgeous pastel tones of colour with a hint of mustard.

2019-10-02-10.53.55.jpg

Now, I wasn’t sure what I was going to mix it up with, nor what photos I was going to use but over the long weekend (the Queen’s birthday holiday, thank you Queenie.) my beautiful eldest daughter and grandson came to visit and as usual, I took a plethora of photos. When printing them out, I loved these photos of my daughter, she was enjoying the warmth of the morning sun on the patio, bare feet and messy hair drying, a cheeky smile and happiness glowing from her at just being in this moment, of being home with family. She will hate these photos…no makeup, wet hair, bare feet, yikes!

Ok, photos selected, what contemporary papers would I use with my freeby sheet? Well, as usual, I am drawn to colour and mood when selecting supplies. In the photos, there is some blues, navy and cornflower blue, and some lovely greens from the garden in the background. So, what I selected was some beautiful papers from the AB Studio, Enchanted Flowers collection.  I love this companies paper collections, the quality of the paper is like cardstock and the designs are very unique with just the right amount of vintage and grunge. Each collection has a cut apart sheet, sometimes two, often one sheet is a set of tags, the other is objects to fussy cut. For this layout, I used two papers from the collection, the Past Forgotten and the Poisonous Flowers, both papers had hints of blue and green.


2019-10-02-10.53.44.jpg

Putting the layout together was a simple process of fussy cutting and layering the foliage 2019-10-02 10.41.51
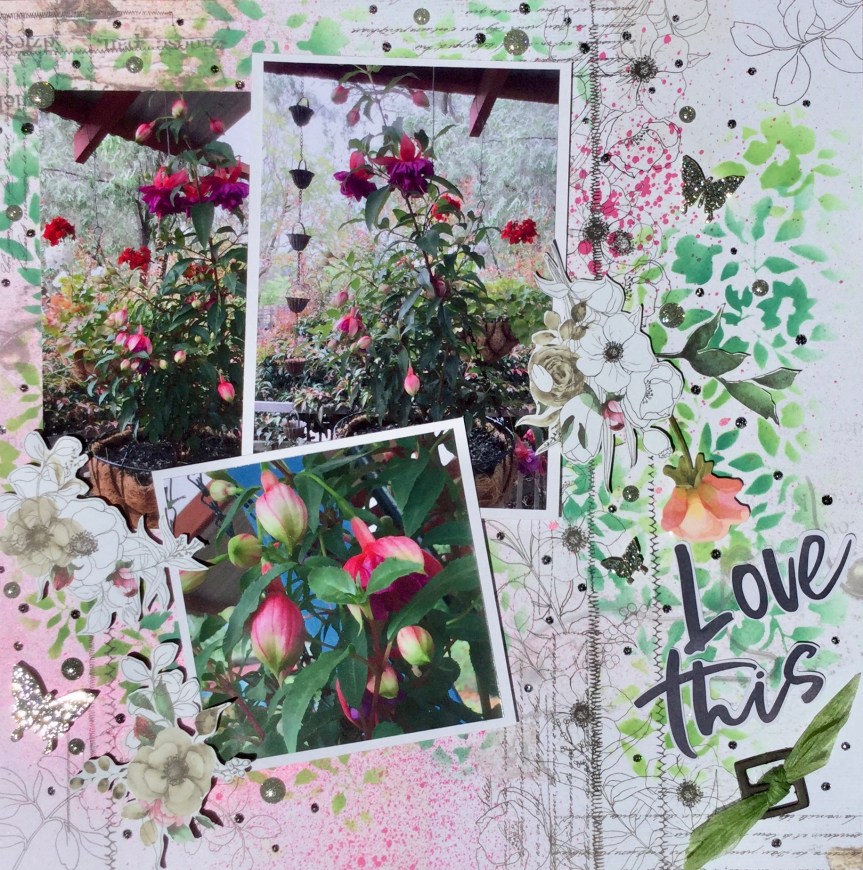
and flowers, creating some texture and depth. I also added some tags cut from the Botanical Beauty, DCWV paper pad and a few Kaisercraft butterflies. Some sprinkles and splatters of watercolour paint in magenta, navy and green finished off the layout.

2019-10-02-11.29.20.jpg

I like how the layout turned out, somehow even though the photos are very contemporary the vintage and botanical elements seem to work well together.

Happy scrapping everyone, I hope you are all getting some creative me time. Please leave a comment below or share with other creatives, remember you need to open the post by clicking on the title to access the comment box.