

Hello,
My first layout with my April Counterfeit kit is based around the Forgery on the Fourth challenge where you make some of the kit supplies. As I mentioned earlier, I had included a few black and white papers which had some similar patterns and motifs to the original March, Hipkit Club kit. This Maggie Holmes paper 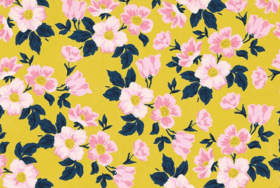 with a yellow background and flowers is really striking in the Hipkit Club kit and makes a bold statement of springtime. I wanted to try and turn my black & white floral into this vibrant mood by simply colouring it in. I decided to use coloured pencils and markers.
First I coloured the leaves in using a navy marker and then worked on the background, first using an ochre pencil and then working over this with a deep yellow pencil. It gave it good coverage and created a mustardy, warm yellow.


Next, I coloured the flowers using a pale pink Copic marker and added the darker pink to the flowers by blending in some rose pink coloured pencil.


I really liked the result, I felt that I had created the same mood and feel which the original had and got busy selecting the other papers for my layout. As usual, I looked for the colours in my photos to help select the papers from my kit.


This layout features photos of my daughter’s navel piercing, an odd thing to scrapbook, you might think? She certainly did! Let me say, that she sent me the photo of her new addition and was very proud to have finally gone through with the piercing. She had worked hard to get into shape, having lost over 24kg, through joining a gym and healthy eating. It was one of her goals to have a navel piercing on a belly good enough to show off!
Back to scrapping…
I wanted to use some of the sprays included in my kit and selected the distress ink. It proved too strong for the look I was after, so after wiping away most of it, I used some white acrylic paint to soften it into dreamy pink clouds and swishes. Then, added some blue splatters of ink.


I had just watched Janet Madison’s latest layout sharing video and was reminded about her using up scraps to create a border frame. I liked the idea of including all the patterned paper I had selected to form the outside border of my layout and quickly put it together.


I liked how the frame looked but when I added my pink mixed media cardstock everything just screamed…NO! I really didn’t like it, I needed something to stop the two clashing. I rummaged through my kit to find something to fix it and pulled out some gold washi tape. The gold tape did improve the clash slightly but I didn’t like the result, it reminded me of old ladies who go cruising in leopard print shirts and gold lycra hot pants!


Things were not going well. I moved onto mounting my photos using the patterned papers, roughing up the edge of each layer. These I liked and I spent quite a bit of time trying to create layers on my background to place them on without creating more clash. It wasn’t quite working with my forged yellow flower paper being so bright. I decided to stamp some foliage onto the background to draw the viewers eye away from all the brightness.


After lots of fiddling around and indecisiveness, I thought I should snip off a piece of the forged paper and use it to fussy cut some flower embellishments. This layout was taking a long time.


At last, things began to work for me and I managed to complete the layout using a selection of embellishments from my kit. It did not turn out like the layout I had envisioned, the use of the gold washi tape forced me to include some gold die cut embellishments. Surprisingly, this didn’t work out so bad, as the navel belly bar is made of gold.


A lot of messing around and not super happy with it, but it is finished.
Time for number two layout…with no gold in sight!

I like it! I hear your pain with the ups and downs and trial and error of making it and yes, it sounds like it took a long time but the result is a stunner!
LikeLike
First of all, that paper forgery is amazing! It turned out beautifully! Even though it sounds like your layout was a struggle it looks fantastic!
LikeLike